
The ‘Dirt’ On How To Backyard Compost
It’s a fitting month to talk about backyard compost, because the second week of May is International Compost Awareness Week! Were you aware? 😊 You can give your compost pile a little hug this month and say to it, ‘I appreciate you’ to celebrate.

Composting is my absolute favorite topic to talk about and teach! I was even bestowed the nickname Compost Queen in college, so you know I’m nerdy about this passion of mine. 😊 This blog post will provide you the basics to start your own backyard compost. Indoor composting folks, there are options for you also which I aim to get to in a future post, but this is for our gardeners, homeowners, environment enthusiasts, and all who can’t wait to turn their waste into a win for their backyard.
Before we ‘dig’ into the details, it’s important to understand why compost is beneficial for your backyard.
Compost Benefits
First, compost turns waste into treasure. Food waste, grass clippings, leaves, etc. are usually thrown to the wind or sent to the landfill where we never see them again. Compost allows you to keep your materials in your own backyard and recycle them into goodness for your soil!
This brings me to the second benefit; compost is a wonderful soil amendment. Myth buster: compost is not soil, it’s a soil amendment. Soil is a complicated ecosystem containing minerals, organisms, organic matter, and a high humus content created over hundreds of years, so it doesn’t break down quickly. Compost on the other hand is made up of only organic matter with a low level of humus content, so it breaks down more quickly resulting in having to apply it repeatedly. Compost helps soil by retaining 2.5x more water (source) and vital micronutrients, so the soil can be at its healthiest! Think about it this way, if you fed your body junk food every day, you are at a higher chance for health issues and sickness. If you fed yourself with a variety of good food filled with nutrients, you will have a stronger immune system to help fight off disease. Similar for plants, if they are planted in soil filled with micronutrients and water, they will be at their best to fight off disease too! This is a score for gardeners as compost helps reduce the need for pesticides and fungicides, and you reap the rewards of eating produce with a variety of micronutrients. Did you know produce only needs 13 micronutrients to look marketable, but our bodies need between 22 to 50 micronutrients for optimal health? (source) Mind blowing to me!
Third, compost helps mitigate climate change. Woah, what? Yep, you read that right. When organic materials such as food waste go to the landfill, they are covered with layers of trash, so oxygen is not able to reach the food waste. In this type of environment, organic waste releases methane gas as it breaks down. Methane gas is 28x more powerful as a greenhouse gas than carbon dioxide according to the EPA, and landfills unfortunately are the third highest producer of methane gas in the United States (source). When your waste is composted at home instead, oxygen is a part of the process, and it emits a trivial amount of carbon dioxide. Compost for the win again!
Now on to the fun part! One of the most frequent questions I get is, “How do I start my compost pile?” I have found many people want to get started but don’t know how, so I’m here to help! I’ve ‘broken down’ how to backyard compost into seven easy steps.
Choose Your Location
Before you start ‘digging’ into what compost system you’d like, it’s important to plan where you want your compost. Compost likes dry and shady locations best, but if you want to put it in a sunny spot you may need to add more water to your pile as it can dry out faster. Myth buster: compost doesn’t get hot from the sun. You may have thought like I did that a sunny spot would help make compost faster, but actually the pile gets its heat primarily from the microorganisms responsible for making your compost. The microorganisms excrete heat as they break down your food, so feed them well and there will be plenty of heat coming from your pile. Neat, right?
2. Select Your Compost System Design and Build it
There are endless options for DIY and store-bought compost bins, but I have narrowed it down to what I think are the most useful and effective styles:
Original Compost Pile- If you have plenty of space and want to keep it simple, the good ole’ pile of compost in your backyard works just fine. Make sure you set aside enough room to have two piles with each one being at least 3’ x 3’ as you will need to let one pile finish and start a second pile (more to come on that in step 6).
Holding Units- This style is a three or four wall structure that contains your pile and is more pleasing to the eye. Make sure to build at least two units for the same reason above that you will need to start a second pile while the first one is maturing. Holding units can be made from a variety of materials depending on your budget including pallets, lumber, blend of lumber and chicken wire, and even concrete blocks. If you use lumber, make sure it is untreated, so the chemicals don’t leach into your compost. My favorite holding unit design you can see below is from Old World Garden Farms as it allows you to add or take boards off the front. This makes for easy turning while still having support as your pile gets bigger.

Tumblers- If the labor of turning your pile seems daunting, one of the best options is a tumbler. These come in a variety of sizes, and bigger is better as the more volume you have, the quicker the waste will turn into compost. I recommend dual-barrel systems, so you can start a second batch while the first one finishes. The tumbler style is the design my parents use! We built a dual system with 55-gallon barrels attached to wooden sawhorses (see below), and it has been holding up well since 2016. You can download the DIY instructions over at my online shop! If you’re looking for store-bought options, I have found that Earth Easy sells a tumbler that is on the expensive side but durable and insulated for the winter months.

3. Collect Nitrogen and Carbon Materials
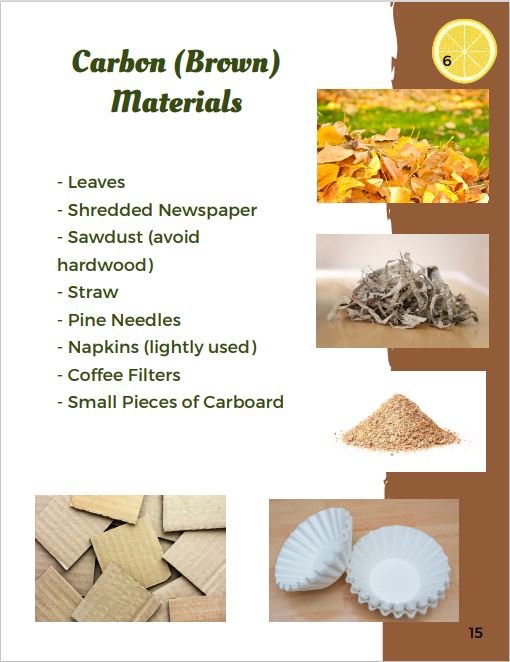
These materials are key ingredients for your pile! Nitrogen (also known as greens) fuels the pile and gets it cooking while carbon (also known as browns) stabilizes the pile. I recommend collecting a stockpile of these materials before you start your pile and to keep an ongoing stockpile if you can as it makes taking care of your pile easier. For example, I collect leaves in the fall and keep them in a garbage can, so I can use them throughout the year. Then I don’t have to spend time collecting carbon materials each time I add food waste to my pile. Another common question I get is, “What can I put in my compost?” I have inserted the list below from my Easy Peasy Compost Starter Guide. Unfortunately, most products that are labeled as ‘compostable’ currently are only able to be composted in a industrial compost facility, so look closely at labels when you’re shopping. Products labeled as “Home Compost” certified should break down in your compost, but they are far and few between.


4. Start Your Compost
Now you’re ready to start composting! You can start any time of year, but the best time to start for my cold weather folks is May as the microorganisms work best when it’s above freezing. Layers are your friend for composting, and you will start by alternating layers of brown and green materials until the pile is at least 3’ tall or the tumbler is half full. The ratio of brown and green materials in your layers is commonly referred to as the C:N ratio (Carbon:Nitrogen ratio). This is an important part of your pile because if you add too much carbon, the pile will be dry and won’t break down. Add too much nitrogen, your pile will smell and also won’t break down. The most common C:N ratio given when you search around is 25:1, but this has caused me to scratch my head many times. 25 parts carbon to 1 nitrogen in weight, volume, density? Do I have to get out my calculator every time I add waste to my pile to figure out if I have the right C:N ratio? Nope! I have simplified this confusing number to using a 1:1 C:N ratio by weight. For example, if I put in 1 pound of food waste (nitrogen), then I put in 1 pound of leaves (carbon). It’s easy and effective! This article from Compost Magazine further explains how compost can be made successfully at a variety of C:N ratios, so don’t fret on being exact. You will also need to give each layer a dose of water until moist and a handful of compost starter (soil or previously finished compost). The compost starter contains microorganisms to boost your pile’s activity.
5. Maintain the Compost
Anything will compost if you give it enough time, but composting following these instructions results in a quicker and better final product. So let’s do it! In the first few weeks, turn your pile every few days which gives the microorganisms a helpful boost of oxygen to get working. After a few weeks, turn the pile once a week or every other week. I find it’s most convenient to turn the pile when I add my food waste to it. I collect our food waste by using a highly sophisticated…family ice cream sized bucket 😊 and store it under the kitchen sink. For our family of two, the bucket gets full every two weeks. When you turn the pile, also check the moisture content. This is done by squeezing a handful of the material and if it leaches out water it’s too wet and if the material falls apart in your hand it’s too dry. If it’s too wet, add carbon or turn more often. If it’s too dry, you need to add water or nitrogen materials. This process of adding materials, turning, and checking moisture content will continue until the pile is as big as you desire or your tumbler is 3/4 full. Then it’s time for the next step!
6. Let Compost Mature
For a pile to fully break down, you will need to stop adding materials and let it mature or I call it finish. During the maturing phase, you simply need to turn the pile once a month and add water if the pile has shrinked considerably. The time it takes for a pile to fully finish ranges based on how big it is and how warm it is outside. For our tumbler at home, it took 3 months for it to mature in the summer, but we also have a smaller volume of material than most backyard composters as we didn’t put garden or yard waste in. The bigger the pile or the more you turn it, the faster it will break down. The organic material will be finished compost when it is a brown, soil-like looking material (see below). I was surprised to find the pile had shrunk to 1/3 of its original size, so if you have a big area you want to apply compost you may want to consider a bigger pile. The compost should be one cohesive material but depending on what you add you could still have some materials which haven’t broken down. Hence, step 7!

Our finished compost before filtering…not perfect but getting there!
7. Filter and Apply Compost
We found in our home compost some materials don’t break down fully in a year such as fruit pits, corn cobs, and avocado peels. Eggshells have also been stinkers as they break down slowly into small pieces but this makes them hard to filter out, so my recommendation is to crush them before you add eggshells to your pile. Any materials which haven’t broken down you will need to filter out and put into your next pile as applying them will not be helpful. Why you might ask? These materials will continue to break down and suck nitrogen from the soil around them to do so. Also, I may have applied unfiltered compost to my mom’s garden and raccoons came to pay a visit by digging up her recently planted seeds. Oops, lesson learned! After filtering your compost, you can apply it numerous places around your yard including your garden, raised beds, trees, landscaping, lawn, and indoor and outdoor plants. The general recommendation for gardens is to apply 2-3 inches to the top layer of the soil each year two weeks before seeds are planted.
There you have it, my 7 steps to backyard composting! There was a lot I couldn’t cover in this blog post, so if you’d like to learn more you’re invited to join me at one of my workshops! Everyone’s compost system is different based on their backyard and lifestyle, so I understand you may have specific questions. Consider signing up for one of my compost coaching sessions, and I can help you 1:1 which would be my absolute pleasure! I will leave you with a favorite phrase of mine about composting, Composting is both an art and a science, so remember to have fun experimenting with your backyard compost and learning along the way!
Keep spreading the compost love by sharing this blog post, taking my fun Compost Quiz below for fun, or download and share a FREE infographic of this blog post below!
